 At 4800 square foot of heated and cooled space, our custom build at Palmetto Bluff in Bluffton, SC requires a lot of flooring. When planning how we want the look and feel of the home to be, the choices we make in a building are always a balance between cost and personal preference. As this is our personal home, and I’d like to stay married, I won’t ride roughshod over my wife’s request that the floor reflects the effort that has gone into a good quality build. So just how to balance that act?
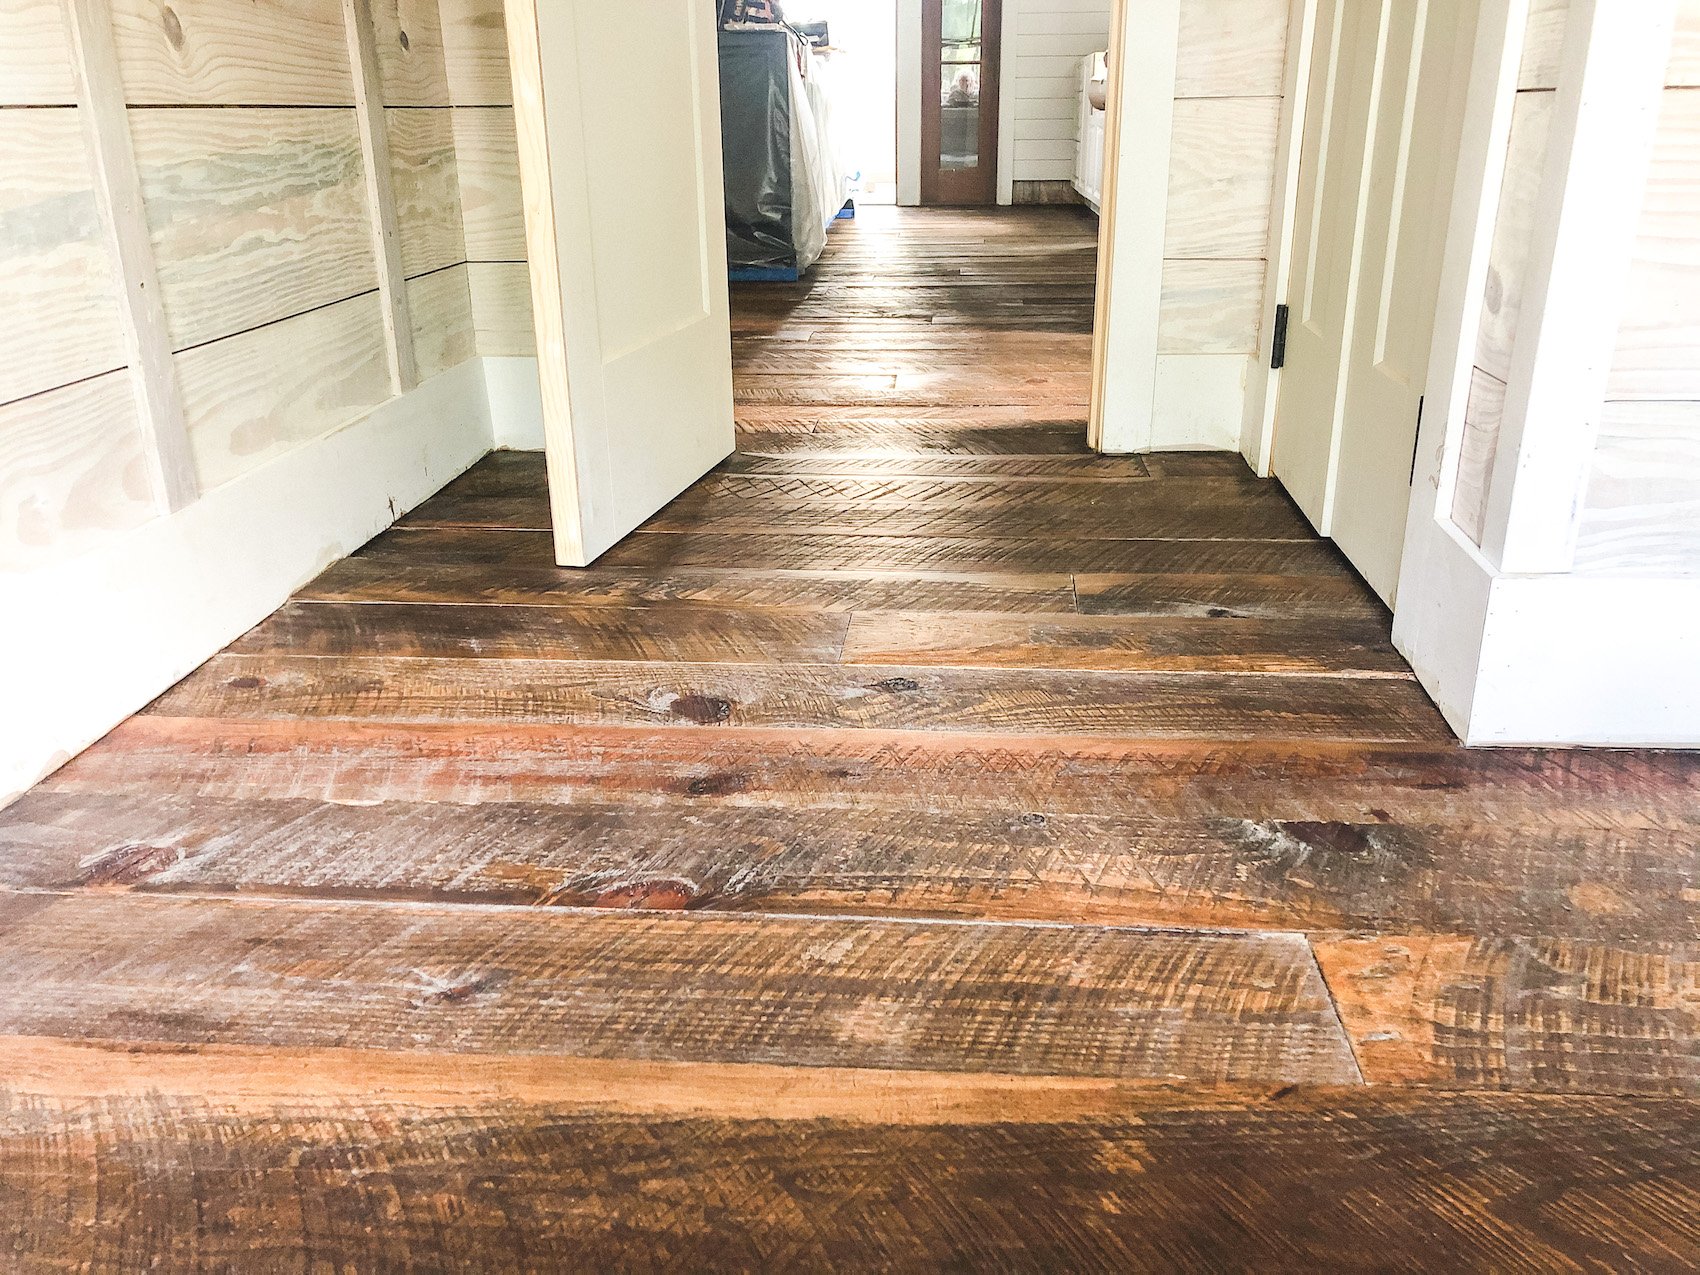
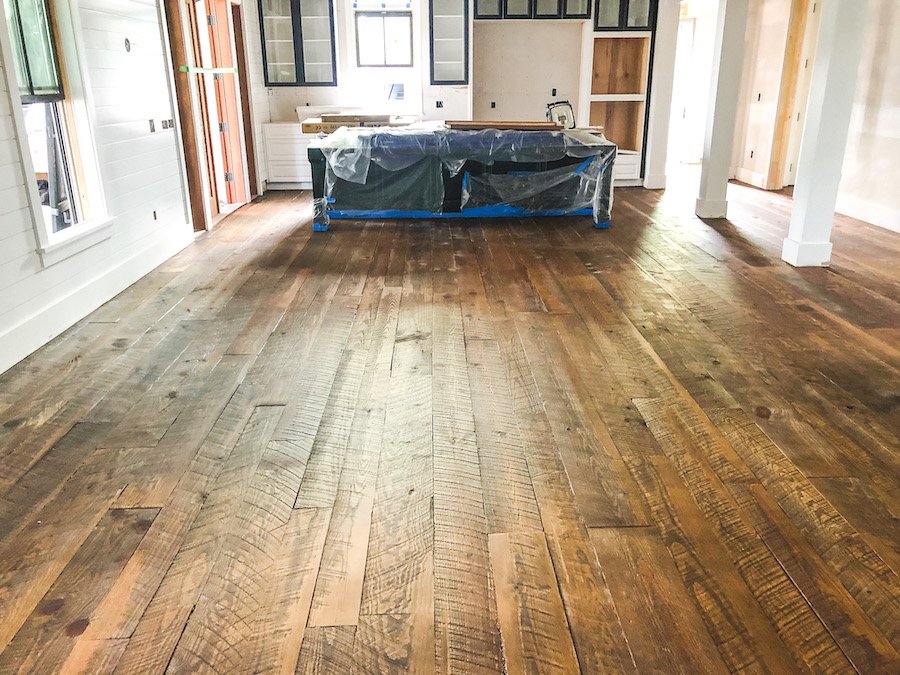
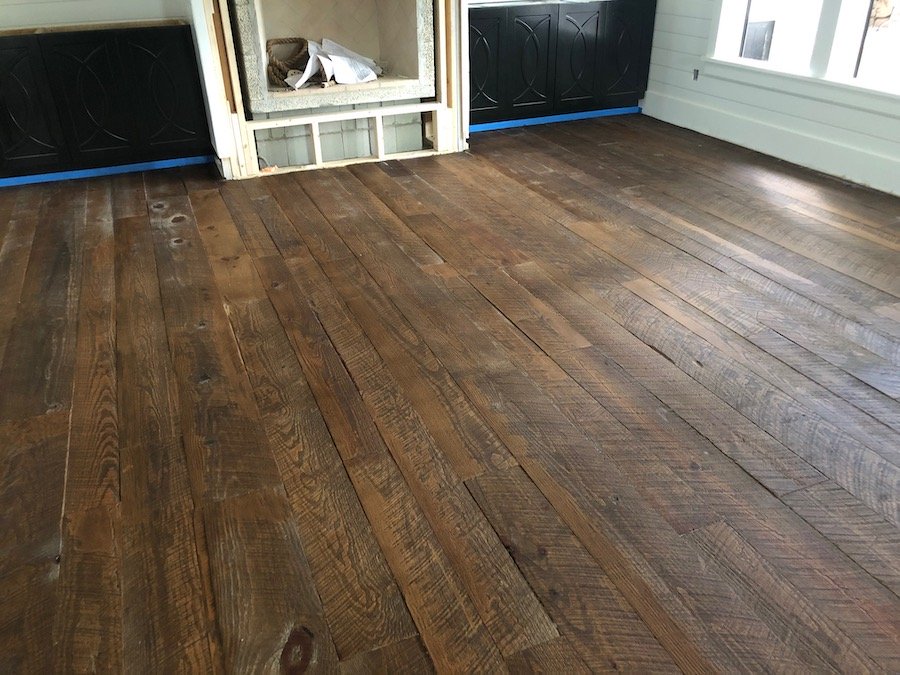
Enter any home in the South and you are more than likely to see heart pine floors. It’s probably the most commonly used and historically relevant flooring material in any local custom home. More recently, we have also seen a trend moving toward the use of “skip planed ” floors where the final treatment leaves some wear and machining marks thus adding an element of character to what can sometimes be a rather plain expanse of flooring. Therein lies the biggest hint to a major cost saving for us and satisfying a demand to be visually impressive.
We have a source of long-leaf southern yellow pine that was cut in the 1960’s to supply a flooring factory but never used. Its 4/4 ” and 5/4 ” thick in wide planks cut with old machinery. The same source can also supply wide, rough-cut red oak boards of similar thickness. Both materials are at around $4.00 per foot, this is remarkably economical compared to typical costs. However, and this is an important consideration, we will need some serious machinery to prepare the boards and to experiment with a way to lay it without the ease of regular sections and tongue and groove joints. On the plus side, we are looking at a saving of perhaps $10.00 per foot for 4800 square feet of flooring.
So off we go and invest in a 200V 5 hp industrial “thicknesser and jointer ” with the power and size to handle these boards. Total cost about $8000 plus our own sweat equity to select, cut, joint and thickness the boards before grading and finally laying them. We reduced the maximum length to about 8 feet cutting out the worst warping and twisting. A good edge was jointed on one side and then the board graded to an approximate thickness mainly on the lower side but occasionally on both where there was significant warping. We then ran them through our circular saw to produce a parallel board discarding the final waste. In all, we managed to use about 85% of the initial delivery, a little remaining for other jobs. The subfloor we used for the build was an engineered wood composite providing a rigid and stable base. After the processing was completed, the boards were conditioned by staying inside the the house structure for 2 weeks. They were then laid on a bed of urethane wood glue (not water based), side stapled, then face-nailed to the subfloor. We left the floors unfinished for about 5 weeks whilst completing all trim-work and then cleaned them up ready for final completion. Joints that had opened up were filled with a black wood epoxy, any ridges removed with a plane and scraper before final sanding. Care was taken with sanding to leave the wood character evident and not to over-sand. Stain was then applied followed by poly and a final wax coat.
Processing the boards probably took about 3 weeks of man-hours or about $6000 in labor. Laying the boards was similar to a typical floor and final prep work about twice the cost adding an extra $5000. So we saved $48,000 on materials, spent $11,000 on labor and $8000 on machinery that we can either sell or use elsewhere so let us attribute back $4000 of that cost. Final saving $33,000. Final effect? Well I don’t use the word often but I think “awesome ” would fit the bill here! It’s certainly unique and at an average of 1 ” inch in thickness, it will last a lifetime.
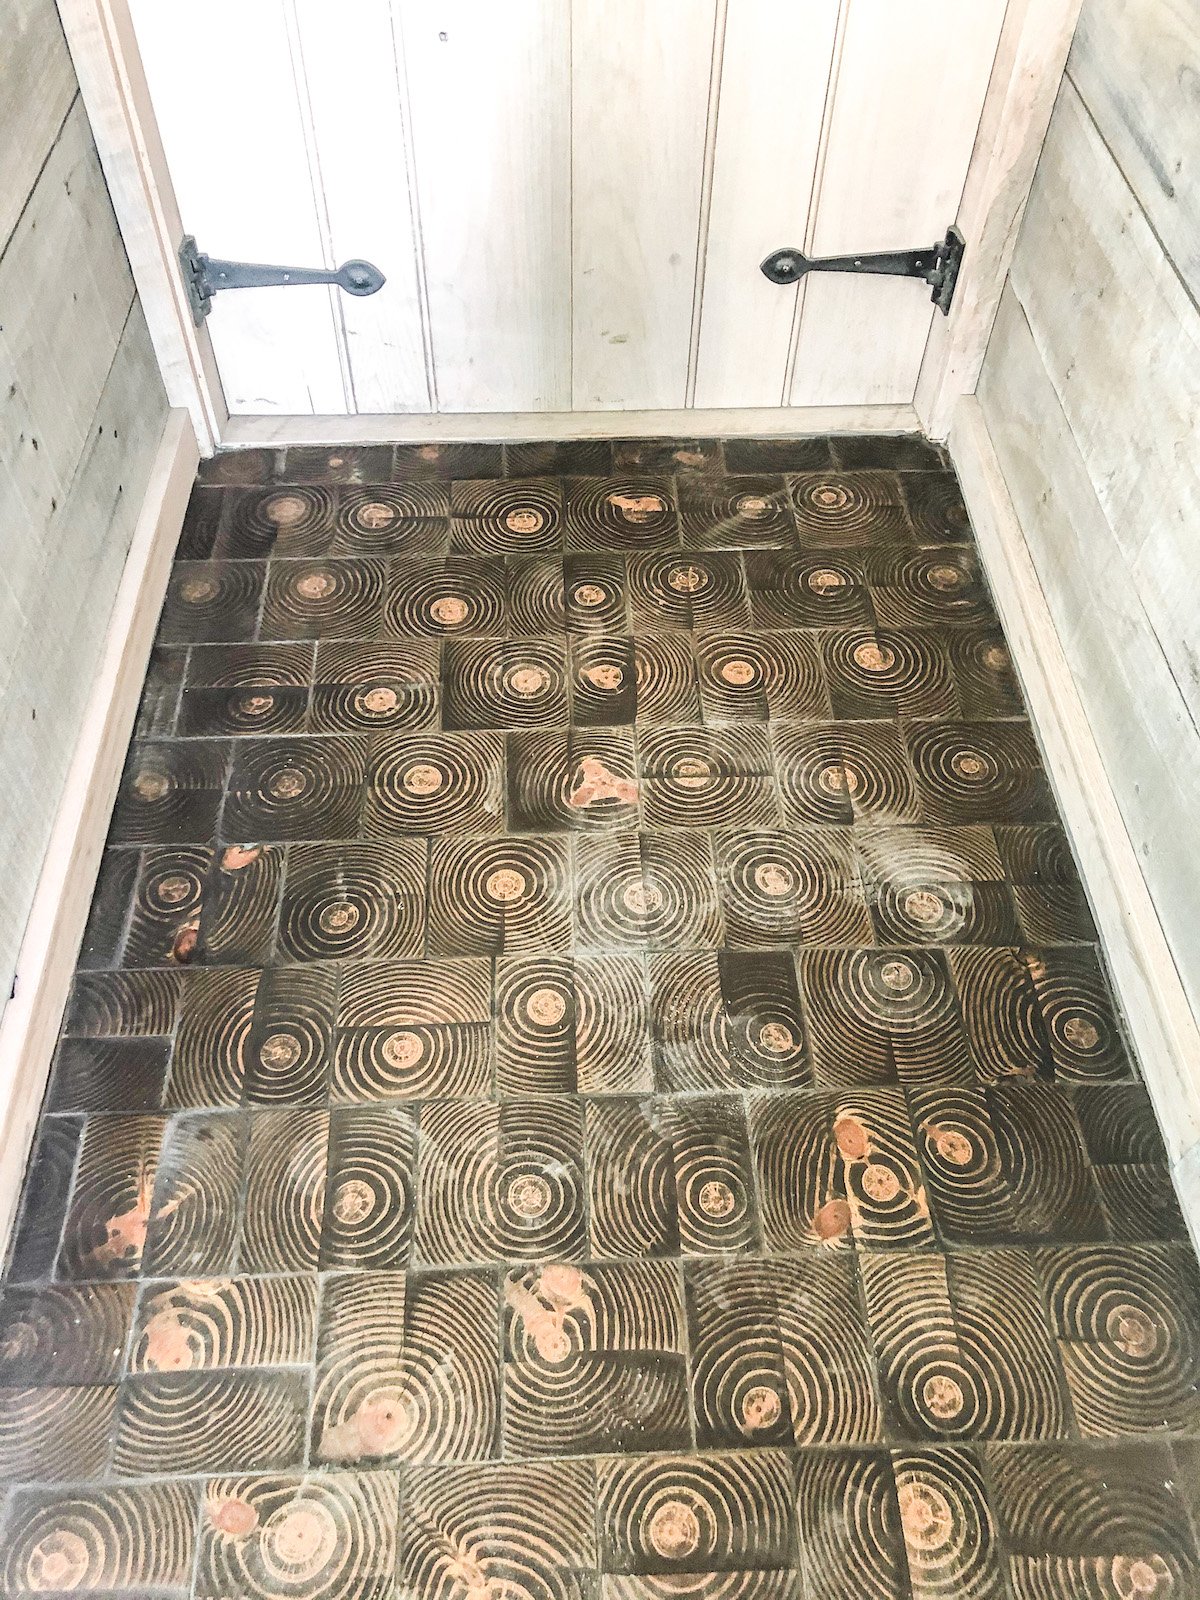
As a little fun, we also took a pile of 4×4 ” treated fence post lumber and cut it up to create a patterned end-grain floor for a smaller entry area. The tiles were 1 inch thick and laid in a mortar bed when still wet. They shrank as they dried then we filled the gaps with black grout and sanded before oiling and staining. The cost was near zero as they were scrap posts. It is in truth pretty boring cutting 250 off tiles but the end effect is quite interesting, if you like an industrial look. Not suitable for every room perhaps, but good in small spaces, and quite nice in this entry area into the garage.
So have a look at the images we have shared here and form your own opinion of whether this was worth it in the end.
Taste is a personal thing and taking this route will not produce a result that looks like every other floor, but we think it suits this application well and best of all, my long-suffering wife remains happy.
Handcrafted details like this are what sets the Simplified Construction team apart. Understanding both the art & artistry that comes with custom building a one-of-a-kind home, but continuing to seek out meaningful ways to reduce costs when possible.
Building in Palmetto Bluff: Tips to Prevent Water Intrusion
Custom Build Project in Palmetto Bluff: A Formula for Estimating Costs
Building in Palmetto Bluff: 10 Weeks and Interior Details Begin
Building in Palmetto Bluff: A Quick Pace and Managing the Timeline
Palmetto Bluff: Under Roof and “Dried-in ” In 15 Days
Palmetto Bluff: Site Preparationand SIPS Panels Delivered
Palmetto Bluff: How to Finance and Build for Cash Flow
Palmetto Bluff: The Building of a Dream Home Begins
Custom Home Building in Palmetto Bluff
The Allure of Palmetto Bluff – Just 90 Minutes from Charleston
Palmetto Bluff: A Real Estate Investment in Vacation Rental
Interested in following this project as in progresses in real time? Be sure to sign up for our blog! Ask any questions you may have or come for a visit and see the build up-close. And, after it’s finished – we’d be happy to show you how it all turned out!
Interested in Learning More?
Our expert teams - from development, investment, real estate, and property management - have experienced it all and have the insight to help you along the way.
Find Out More